July 24, 2015

My Black Journal - if you're going to be weird...

Hello mixed media friends!
 Today I'm hosting the Lindy's Stamp Gang blog and
sharing the first page of my new black journal. I haven't done the cover yet , I think I'll wait for the big idea to come :) I'm going to fill all the pages with quotes and thoughts! So, here is my first page with a  quote I really like: 'if you're going to be weird, be confident about it'!


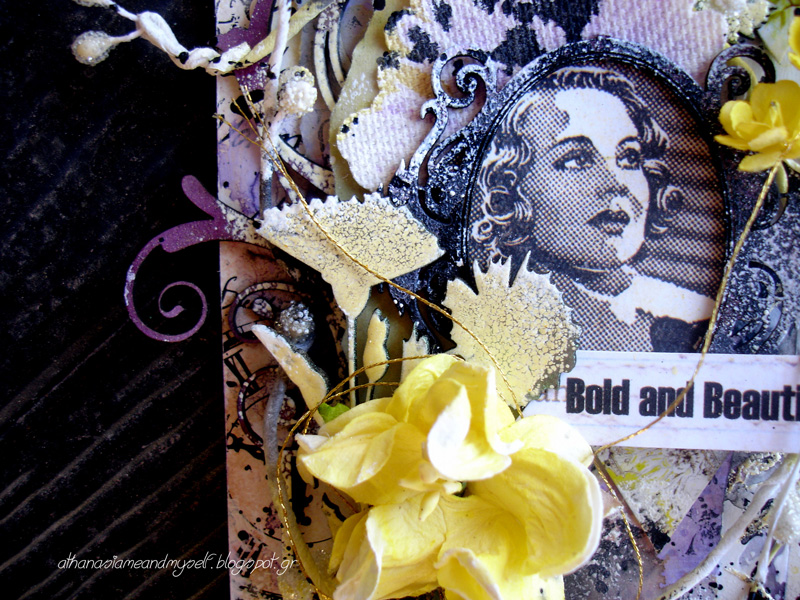
I never had a black art journal before, actually I think this is my first time working on a black surface and I have to admit this was a challenge for myself! First I used the Frozen Jack Frost spray to white up the background so as to give a boost to the colors to pop up. I had a lot of fun with the July 2015 Color Challenge Mega Set and I had a blast using everything of this set!

After whiting the black surface, I let it aside to dry and started altering the chipboard pieces. I used the Madonna Robe Blue embossing powder on all of them. I didn't use any gesso before applying the embossing powder because I wanted to show the real color of the chipboard and just the glossy accents the embossing powder gives. 

After dealing with the chipboard pieces, I worked on the background. I used several stamps and all the embossing powders of the Mega Set in order to give texture and color range on it. Then I glued the photo and the chippies.

I sprayed with all the sprays of the set here and there, and when I was satisfied with the result, I glued a couple of buttons, the butterfly and the alpha stickers.

As a final touch, I made some splashes with the sprays and some gesso in order to give more contrast to the composition.


I hope you got some ideas today how to use the embossing powders on all over your project!
Thank you for visiting and have a lovely crafty day!


July 14, 2015

What if you fly?

 Hello mixed media friends!
Today I'm hosting the Mixed Media Place with a small canvas I created based on a great quote which I absolutely adore.


I fell in love with this beautiful photo I found on Pinterest!
The moment I saw it I knew I had to scrap it!
So. I decided to make a small canvas in vintage style...
I gathered some sprays, silks and embossing powders and started working the background! 


First I used the light paste with a stencil and after that I used an embossing powder with a stamp to create more texture. Then I applied some gesso with a pallet knife and I started playing with the sprays in order to create a beautiful contrasting background.


When I was satisfied with the painting, I glued  all the embellishments and chipboard pieces and repeated the painting process with the same colors, in order to embody them to the background. 

I wanted to do something different with the chipboard flower so as to give a bright look and pop out from the background. I altered it with a stamp and embossing powder and I also used the Creme Brulee Cream LSG spray. I just love how it turned out!


I also glued some glitter on the wings in order to give some extra magical sparkle on them...


As some final touches I used the Solar Gold and Mediterranean silks here and there. These are two of my favorite colors and I really love use them on my projects!
Lastly I spread some Copper Glass Glitter in several spots.

I hope you liked today's project and got some inspiration!
Have a lovely crafty time! 


***supplies from Mixed Media Place store 
***sprays and embossing powders from Lindy's Stamp Gang
***chipboard by 2Crafty


July 12, 2015

Bold and Beautiful

Hello again!
This is my second project for 2Crafty !
It's an altered tag I got from a flower package.
I made it especially for a dear friend of mine.


For this project I used a Tiny Victorian Frame to put this beautiful lady inside
and a flower from the Wildflowers set to decorate it.
I altered both of them with two shades of embossing powders.


For the cluster of the composition I used the Geneive Corner which I altered with purple spray and butter shade embossing powder. I also used a beautiful scalloped Element from Set 2. I cut it in half, altered both pieces with embossing powder and glued them on top and bottom of the composition.


2Crafty Clipboards used:
                        Frames Tiny Victorian (unit of 3)   Element Set 2 (unit of 3)
Corner Geneive (unit of 3)Wildflower Set (unit of 3)


***all sprays and embossing powders from Lindy's Stamp Gang


>>>

With this project I'm entering the following challenges:

Kiev Skrapklub:color challenge

ScrapKopilka: second life on packaging challenge

Saratov ScrapbookKraft and chipboard challenge

>>>

Thank you for visiting!
Have a lovely crafty time!


Imagine... underwater walk :)

 Hello dear friends!
Today I'm sharing a mini canvas with lots of 2Crafty chipboard goodies!
 Recently I joined this amazing team I'm very happy and honored for that!
I had a lot of fun altering the chipboard pieces
with Lindy's Stamp Gang sprays and embossing powders.


As my theme was about the sea, I chose these beautiful Bubble Clumps in order to create some bubbles for my background. I drawn some to make a connection between the paper and the chipboard pieces. I also used the big Circle Revolution Frame as a giant bubble to put inside my fantasy: a walk on the seabed :)


I decided to use a black embossing powder to alter the word 'Imagine' in order to create a little bit of contrast on the bluish composition... I really like how it turned!

 A walk to the bottom of the sea with a shark-pet requires some road signs as not to cause traffic jam at the ocean streets, don't you think?
So I chose these cute Mini Fast Forward Arrows to create the street signs.
I altered them with embossing powders. I just love how cute they look!


2Crafty Clipboards used:
Bubble Clumps (units of 3)   
 Imagine Title (unit of 3)  Mini Fast Forward Arrows (unit of 3)

***all sprays and embossing powders from Lindy's Stamp Gang

>>>

With this project I'm entering the following challenges:

Modnoe Hobby: Underwater challenge

Factory Decor: Summer challenge

Scrapki Wyzwaniowo: Sea challenge


>>>

Thank you for visiting! 

July 8, 2015

be your kind of beautiful

Hello Lindy's Stamp Gang friends! 
Today I'm sharing a canvas about beauty...


I would like to show you one favorite technique: Lindy's Embossed Crackle
It's pretty easy and, trust me, you will love the result!

  1. Choose a chipboard piece, or any kind of paper you like.
  2. Put a thin coat of gesso. You need a white surface so that it will show the actual color of the embossing powder after melting it.
  3. Spread the embossing powder (I used Bonjour Butter) on your chipboard piece. Remove some of it with your finger and heat it with the heat gun.
  4. That's it! Your chipboard is ready to use on your projects. The fact you removed some of the embossing powder with your fingers, influences the finished look of the melted embossing powder.


Let's alter now some alpha stickers with Midnight Pewter embossing powder...

  1. Take some alpha stickers and an embossing powder of your choice.
  2. Spread the embossing powder (I used Midnight Pewter) and heat it! The embossing powder completely changes the piece and it's ready to use!
Crackle finish on stickers:
  1. Use the back side of the stickers. Spread ONLY SOME GRAINS of embossing powder. It is very important to leave some spots white! Heat it. It's ready to use! pic#3
  2. I glued the altered alpha stickers on the first chipboard piece I altered and put a couple of brads. pic #4
Here is my altered chipboard on the finished project...


I also altered a chipboard word with two shades of embossing powders: Midnight Pewter and Orbit Olive Gold

To finish my project I used the July 2015 Limited Edition Spray Set in order to create a mixed media background.

Thank you for visiting!
Have a lovely crafty day!


July 1, 2015

in dreams...

Καλό μήνα κορίτσια! 
Ελπίζω τώρα που μπήκε ο Ιούλιος να σταματήσουν οι βροχές για να κάνουμε και κανένα μπανάκι!
Η νέα πρόκληση του Scraps N Pieces είναι ονειρική, πολύχρωμη και μαγευτική!

Ηello again!
This is my layout for our Dreams challenge at Scraps N Pieces.


Για περισσότερη έμπνευση σας έχουμε και ένα moodboard φτιαγμένο από... εμένα :)
Ελπίζω να σας αρέσει και να πάρετε μπόλικη έμπνευση από αυτό!
Ο μόνος κανόνας είναι να συμπεριλάβετε τη λέξη όνειρο, ή κάποιο παράγωγό της στη δημιουργία σας...

It is based on a dreamy moodboard made by... Me :)
The only rule of this challenge is to use the word dreams/dreaming/dreamer/etc on your project!


Όπως πάντα προσπάθησα να συμπεριλάβω στην σελίδα μου όσα περισσότερα στοιχεία του moodboard μπορούσα: χρησιμοποίησα παρεμφερή παλέτα χρωμάτων, το quote, τη μαγική ατμόσφαιρα και μια ονειροπαγίδα την οποία έφτιαξα με τα χεράκια μου.
Τα μαύρα κομμάτια χαρτιού παίζουν τον ρόλο των βράχων που αιωρούνται στο κενό... Άλλωστε είναι ένας κόσμος ονείρων χωρίς κανόνες και ορθόδοξη διάταξη και φυσικά η κοπέλα που ετοιμάζεται να 'κολυμπήσει' στον αέρα είμαι εγώ :)

I used all the colors of the moodboard, the quote, I got inspired by the magical feeling it gives and also made a dream-catcher with 2 Crafty chipboard circle and gold thread...
In order to create the dream catcher, I found a tutorial on the web and followed the instructions. It's pretty easy and fun and I love the result! Ι stamped the word dream in the center of it and used it as a source of a color explosion!  
Ι also used paper from 7 Dots Studio which I torn it into pieces to create some floating rocks... 
Actually they are floating in blank and the girl who is going to 'swim' in the air is me,  after all it's my dream :)


*sprays and embossing powders from Lindy's Stamp Gang
*all chipboard pieces from 2 Crafty Chipboard
*Paper from 7 Dots Studio
*white paper, inks and permanent pens from Scraps & Pieces Emporium

>>>

Θα περιμένουμε τις ονειρικές δημιουργίες σας στο Scraps N Pieces μέχρι τις 26 του μήνα!
Μία νικήτρια θα κερδίσει αυτό το υπέροχο δώρο από το μαγαζί Scraps & Pieces Emporium!!!


So, will you play with us for a chance to win this amazing prize???
We'll be waiting for your projects at Scraps N Pieces!