September 24, 2015

The sound of silence

Hello dear friends!
Today I'm sharing my second project for this month I created for  2Crafty Chipboard blog.


'The music is not in the notes, but in the silence between' - W.A.Mozart
This is an amazing quote I always have in mind when I'm playing the piano.
As a musician I love making projects about music, so I decided to make one with this favorite quote of mine. 


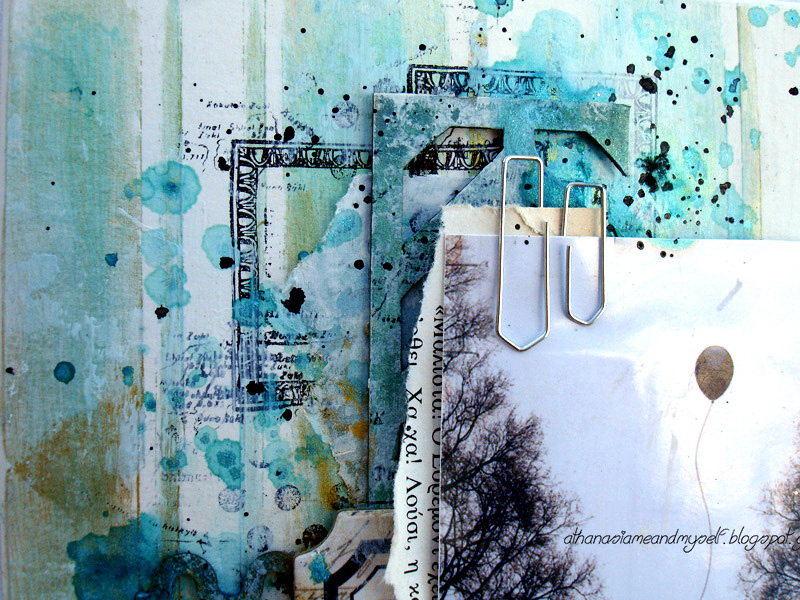
For my page I used the word "love" as the main title, which I cut from the love border.
I really like the calligraphy style of it and I think it has the perfect size for the tittle.
I altered it with black embossing powder and placed it vertically to much the whole vertically flow of the page.

 I also used some pieces from the 6x6 'Moroccan Panel' in order to give texture and interest to the background. I absolutely love this design. It matches with any kind of style and it is very easy to cut it in pieces and use them on your projects. I used black and white gesso and silks to alter them.

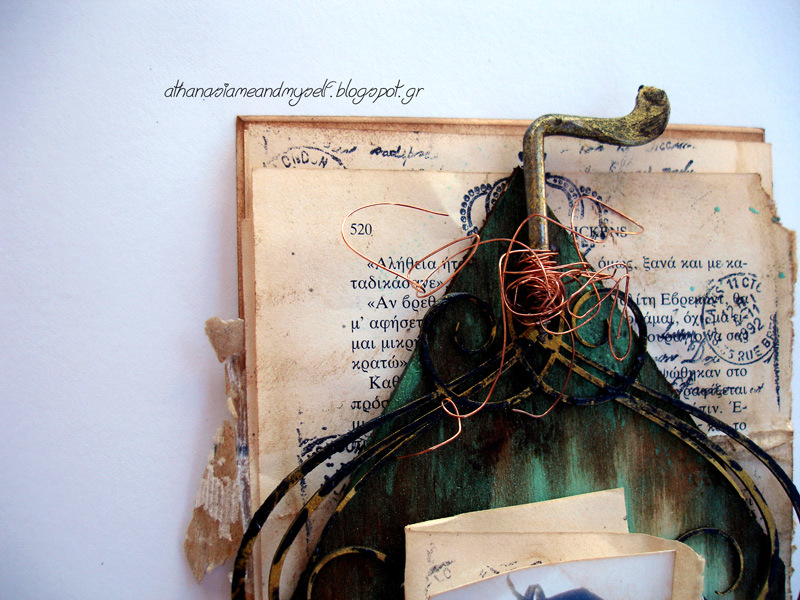
This big key from the 'Vintage Keys' set was the perfect embellishment to complete my composition, because it represents the key of perfection in what has to do with music.
I painted it with African Jade silk, my favorite color, and a little bit of black and white gesso.

***silks and primary elements by ColourArte
***embossing powders by Lindy's Stamp Gang

2Crafty Chipboard products used on this project:
LOVE border
Vintage Keys set
6x6 'Moroccan Panel

Love Border (unit of 3)
Moroccan Panel (units of 3)Vintage Keys (unit of 3)


Have a lovely crafty day!


September 22, 2015

Balloon's journey

Hello dear friends! 

Today I'm hosting the Mixed Media Place.
I had this beautiful photo for a while and couldn't decide what to do with it, until now. I love the black balloon and the darkness of this photo that creates emotions of hope and sadness at the same time. 

For this project I used papers, stickers, stamps and stencil from 7 Dots Studio Soulmates, Yuletide and Lost & Found collections. I also used 2Crafty Chipboard pieces and ColourArte silks and Primary Elements to color the composition. 
First I applied white heavy gesso on the canvas. When it was dry, I used the stencil (by Yuletide collection) with the Celedin and Honey Amber silks. They dry pretty quickly. Then I made some stamps and glued the papers. The background work was done already. 

Next thing to do was to alter the chipboards. I used three shades of LSG embossing powders, blue, grey and black.  After I placed them in composition, I glued the stickers and the rest of the embellishments.

One thing I love to do often in my projects is to use wire in different ways. This time I tied it on a button and rumpled the edges to create a messy look. I really like the effect and dimension it gives at the composition.

I also like to use paper clips even I'm working on a canvas. I think they are so cute to use in any kind of project, don't you think?

As final touches I spread some of the Primary Elements blue shades here and there and sprayed water. It's the most fun thing to do before I finish my project :)
***supplies from Mixed Media Place store

That was all for today! 
Until next time, have a lovely crafty day!

September 20, 2015

Hello little fairy!

Hello everyone!
Today I'm sharing my project for ColourArte.
It's a small canvas in a shadow frame for my daughter's bedroom.


ColourArte Products for this project:
Other Supplies:
  • Balsa wood
  • Stamp
  • Gesso
  • 2 Crafty Chipboard
  • flowers
  • Prima resin window
  • Wooden label
  • Gold thread
  • Sequins
  • Stapler and scissors
  • Shadow Frame
So, lets get started!

1. I cut with scissors the balsa wood in house shape and painted it with the blue shades Twinkling H2Os Watercolors and with the Warm Grey color the edges. I also made with my pencil a couple of carves to make the wood pore real.


 2. I stamped the dress of the fairy, painted it with the Twinkling H2Os Watercolors and cut it around with scissors. Then I took one of my daughter's photo, cut around the part of the head and glued it on the fairy's painted body.

3. As I wanted my fairy to hold something like the original on the stamp, I decided to make some hearts with rice paper. I painted them with the Twinkling H2Os Watercolors African JadePearl Gold and Vanilla Bean and used the stapler to give it more interest.

4. In order to alter the chipboard pieces I used all the Twinkling H2Os Watercolor shades plus the Radiant Rain spray Sunburst. I chose this spray because it has a really bright yellow and I really love it!

5. I glued all the embellishments on the balsa house and then I spread some of the three Primary Elements colors here and there. I really love how they blend together and I always use them as a final touch on my projects.

6. I glued the fairy with the hearts on the composition and the hole project on a white cardstock which I had gessoed previously. I placed in a IKEA shadow frame and made some doodling and splashes around the composition.

Here are some closeups...


...and the finished project. It's already hanging in my daughter's bedroom :)

>>>
With this project I'm entering the Paper Dvizhnik challenge. I really loved the color pallet of this beautiful moodboard!

>>>

***Here is my other project with a similar balsa house


Have a lovely crafty day!

Finally I understand...

Hello everyone!
Today we have a new Creative Gym at Mixed Media Place:

Proverbs and Sayings

You may create any type of art inspired by proverb or saying. 
From cards to layouts, altered art and journal pages... be free and create some art!

Here is my project


'Finally I understand little things are the most important in life'. 
I chose this simple but very important for me quote, because it represents what I'm trying to do in my life this period. 


I wanted to place the photo with the quote on a house. Don't ask me why, I just had this vision. Maybe the house is the symbol of the enduring values of our life. So, I took a piece of balsa wood and cut a house shape with my scissors. I painted the edges with the Gathered Twig Distress Stain and the rest of it with the Celedon Silk.


 To alter the chipboard pieces I used the Honey Amber silk and Black Heavy gesso. I glued them on the painted house, then I glued the photo with a folded old paper and last the metal embellishments.


Finally I glued the hole composition on some stamped pages from an old book and all these on a cardboard in the same size. The last thing to do was to wrap a twine all around the project.

***You can find all products at Mixed Media Place store

So, I'm looking forward to see your projects for our challenge.
If you want more inspiration please visit the MMP blog to see what created the rest of the ladies.

 >>>

With this project I'm entering the September challenge at Colorful World with this beautiful moodboard. I got inspired by the wood and the colors.


>>>

Thank you for visiting!
Have a lovely crafty day!


September 14, 2015

dream in black

 Hello dear friends! 
Today I'm sharing my first project as a ColourArte DT member. I’m so excited to be in this amazing team and can’t wait to share more projects with you!

 It's the fourth page of my black journal of quotes. I just can't have enough of this dark and mysterious background - still haven’t made the cover yet.

I chose this time to use the word ‘dream’ as a favorite word and thing to do. I wanted to keep it simple and focus on this word, so I decided to use only one more chipboard piece, gold thread, shiny flakes, gesso and of course a lot of colors! Using only such material helps also to keep my journal flat, which is very important to me.

So, here are the ColourArte supplies I used:

Chipboard pieces: The first thing I did was to paint  the word ‘dream’ with the Solar Gold silk. I put quite a few coats of color in order to get a thick and shiny result. I also painted with the same color the other chipboard piece Then I glued them on the page.


Background: Next thing to do was to use the Radiant Rain Mists, in order to create a beautiful colorful background. I sprayed with all the colors here and there and left the Pewter as the last to spray with – I really love this color!!! Then I made a lot of splashes with the silks to give an even  more shine and glaze look and the two Primary Elements colors for texture. I really love how all these amazing and different types of colors blend together and create such an amazing look on black surface.

Last thing to do was to make some splashes with the white gesso and glue the tread and the shinny flakes. That’s all!


I hope you got some ideas on how to use your ColourArte supplies on black surface.
Have a lovely crafty day!


September 12, 2015

She designed a life she loved

Hello dear friends!
Today I'm hosting the 2Crafty Chipboard blog
with one more page from my black journal.


I wanted to keep it simple, so I decided to use only 3 chipboard pieces, colors and shiny flakes,
and I think I found the perfect chipboard pieces to picture this beautiful quote.

I used a butterfly from the 'Marriane's Butterflies',  a piece of 'Square Collage Panel' and a bulb of the 'Light Bulbs' set. First I cut the butterfly in three pieces (center and two wings) and glued it on the light bulb. Then I glued on the page all the chipboards.
I colored all them with silks, a small amount of primary elements and finally some splashes of white gesso.

***silks and primary elements by ColourArte

2Crafty Chipboard products used on this project:
Marriane's Butterflies
Square Collage Panel
Light Bulbs

Square Collage Panel (units of 3)  Marianne's Butterflies (unit of 3)  Light Bulbs (units of 3)

>>>
With this project I'm entering the Fashionable Hobby challenge with this beautiful moodboard.


>>>

For more inspiration, here is an older page from my black journal.
I used the same 3 chipboard sets, plus an arrow from the the 'Mini Fast Forward Arrows' set.

So, I hope you got some ideas on how to use and alter your 2Crafty chipboard pieces on your projects!
Have a lovely crafty day!