August 28, 2016

Prima BAP layout

Hey friends!
I created a Layout based on Prima's BAP August challenge.


I hadn't really created for a long time something just for myself, as I'm always too busy with the design teams...I enjoyed it :)

My page is based on Prima's BAP sketch made by Riikka Kovasin...

...as you can see I turned the sketch vertically :)

*
Prima products used in this page:
Ledger pack 12x12
Forever Green - Botanical Garden 6x6 
Flower 'Coffee Break' collection
Art Alchemy Acrylic Paint - Metallique - Light Patina
Art Basics - 3D Gloss Gel
Art Basics - Heavy Gesso - Black
Art Basics - Heavy Gesso - White
Art Basics - Mixed Media Silicone Brush 1"
Art Extravagance - Rust Effect Paste
Art Ingredients - Art Stones
Art Ingredients - Mini Art Stones
Art Ingredients - Mica Powder - Copper
Art Ingredients - Mica Powder - Rust
Mechanicals - Rustic Washers
Mechanicals Mini Brads
Vintage Vanity - Clear Stamp - Seamstress
Vintage Vanity - 3x4'' Clear Stamp - Adverts
Vintage Vanity - 3x4'' Clear Stamp - Book
Elementals - 6,5x10,25 Stencil "Harlequin"

*
Other supplies 
2Crafty Chipboard
stapler
wire
craft grass
charcoal pencil
black pen for journaling


Thank you for stopping by
Have a lovely crafty day!

xxx
Athanasia

August 26, 2016

Color your world - mixed media canvases

Hello dear friends!
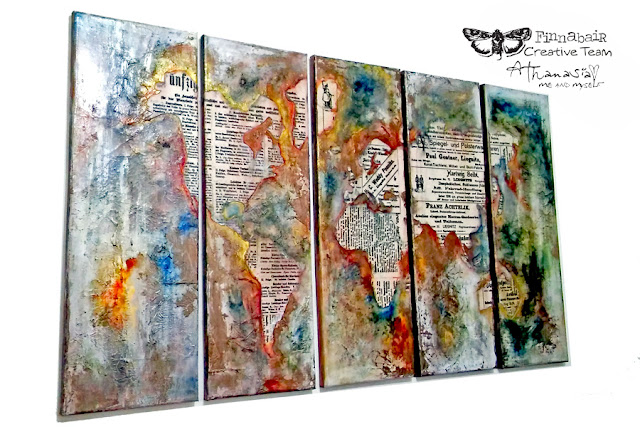
Today I'm sharing a BIG project, the biggest I ever created lol
The whole project measures 1 meter (5 canvases 20x60cm each), it took me many many days to finish it and now I'm very proud it's hanging on my wall :)


I used lots of amazing Finnabair products to create it
- scroll down on Finnabair's blog post here to find the supplies list with links.

I was keeping for a long time two amazing resist canvases, designed by Finnabair, to make something special. 
The time came when I found incidentally on Pinterest some ideas with world map art like wallpapers, digital collages and art pieces. I was very excited, so I decided to make my own piece of art in my own way. 

Here is how I started

1. First I secured the 5 canvases together with masking tape. This made my work much easier in the next steps.

2. Then I cut very carefully with scissors the land pieces of a map that was the same size as my canvases and this way I created a large stencil. I didn't throw away the cut pieces...

3. I used them as masks to create the land for my project. I placed all the pieces one by one on the resist canvases and I draw the outline with a pencil. Then I cut them with scissors and put them aside.

4. When I was done with cutting the land, I placed my handmade stencil on the canvases and put each one of the cut resist canvas pieces in the right place. This was a little tricky as there were too many small pieces especially for the islands, but it helped me to learn some geography lol :)

5. Before I glued down the lands,  I used the Silicon Brush to give  the whole surface a thick layer of Heavy White Gesso  and let it dry. To glue the resist canvas pieces I used the Clear Sculpture Medium - it was really the perfect glue for this work! I let it dry outside for a couple of hours.

6. After it was dry I started working with the sea sections. I used the Clear Sculpture Medium again with napkins. I glued them randomly and wrinkled to create texture. This gave also depth and interest in the finished project. I left it overnight to dry...
((Unfortunately, from this point onward I haven't any more photos of the process to share as I was so captivated with the painting part that I didn't think to take some)


7. The painting part was so fun, it was really worth waiting for... 
I made custom paints with the Soft Matte Gell and Mica Powders and started painting all over the canvaces, here and there, without much thinking. I used mostly the Rust Mica Powder (I love this color), as well as Gold and blue shades of  Frozen Lake and Deep Waters. I also used some similar shades of Primary Elements.


When the first layer of paints was dry, I used a couple of warm colors of Art Alchemy Paints, Pure Sunshine and the Fresh Orange, as well some white acrylic paint to lighten the project.

 I love how all these colors blend together, highlight the texture of paper napkins and contrast the beautiful lands of the resist canvas pieces!


I hope you got inspired from my project.
Thank you for visiting,
have a lovely crafty day!

xxx
Athanasia

August 22, 2016

Textured background with Radiant Gel and Vivids

Hello :)

Just a quick post today, a couple of ATCs with a video tutorial
I created with amazing ColourArte products.

In this video I will show how to create an amazing textured background 
with a  Radiant Gel - 3D paint in no time!

I hope you will enjoy it with the process and get inspired! 
Don't forget to leave me a comment, as well give me thumbs up on my You Tube channel  :)


ColourArte products I used for this project

H2O: Siam White
Vivid Ultra MetallicGinger Peach, 
Vivid Ultra Metallic- African Jade
Primary Elements -
 "Mermaid" France Papillon Series: 
Nutmeg, Ocean Wave, Guatamalan Green & Copper Pearl.
Radiant Gel - Copper Pearl
The Solution


Thank you for visiting,
have a lovely crafty day!
xxx 
Athanasia


August 19, 2016

Summer snow

Hello dear friends!
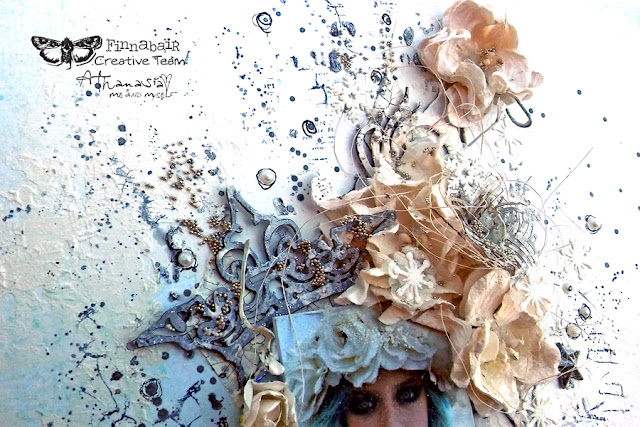
Today I'm hosting the Finnabair blog with a Summer/Wintery layout.


 I'm not happy that Summer is coming soon in the end and I'm not champ at the bit for Winter.
The fact is that I love both Summer and snow and I'm happy that I managed to put them together.
Despite the fact that they are two completely different things and they never exist at the same time , I wanted to incorporate them together in one composition and give them the chance to be together, even for once :)

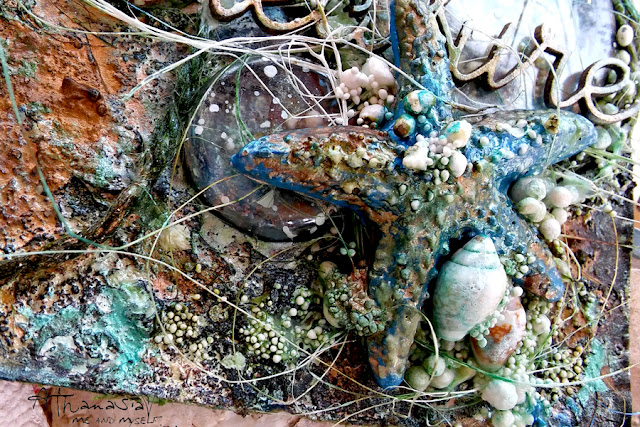
On my page you can find seashells and summer colors, snowflakes and wintery feeling...
All these are well combined together with beautiful mechanicals, Micro Beads and Glitter, flowers and chipboard pieces.

The Mechanical stars made the perfect link between summer and winter as they falling down from the snowing sky into the sea to become one with the starfish.  


The White Crackle Paste, as well the White Gesso constituted a beautiful base for the summer and winter colors and made all the different elements of the composition come together and incorporate in one piece.

This beautiful mechanical flower is one of my favorite elements of the project because it looks like a snowflake and a flower at the same time and so lovely  matches my theme. 
I glued inside with the 3D Gloss Gel a beautiful ring which was in the Mechanical set and inside a screw brand. 
I love how the Mechanical pieces complement each other and make new unique pieces. The combinations are endless! 

When I painted everything white for the Winter scene, I painted with different colors the Summer one. I used soft tones of Primary Elements in teal, brown and grey and the Silver Spoon Acrylic Paint to make splashes all over the page.

In the video I made especially for you, you can watch how I put together this page.
I hope you like it and get some Summery/Wintery inspiration.


*** Scroll down here to see a supplies list

*Chipboard pieces by 2 Crafty
*Colors by ColourArte
*Paper 'Summer snow' by 13arts

>>>

Thank you for visiting,
have a lovely crafty day!

xxx
Athanasia

August 7, 2016

Summer tag - upcycle and create

Dear friends

Today I'm sharing a mixed media summer tag I created for ColourArte.


I used the cardboard and the plastic cover from the package I had from a Mechanical set by Finnabair.I had so much fun upcycling and altering them and I really love the result!

I hope you will enjoy my video with the process and get inspired! Don't forget to leave me a comment, as well give me thumbs up on my You Tube channel  :)


ColourArte products I used for this project

Vivid Ultra Metallic-Blue Bayou

Vivid Ultra Metallic-African Jade

Vivid Ultra Metallic - Teal Zircon

Primary Elements - "Mermaid" France Papillon Series

H2O - Summer Breeze

some details...


Thank you for visiting,
have a lovely crafty day!


xxx
Athanasia

August 2, 2016

Workshop in Spain 17/9/2016


Hello dear friends!
I'm so excited to share with you that I was invited to teach a workshop in Madrid Spain
during a fabulous event called Zumo Creativo hosted by Lola Barbosa! 

 It will take place on 17 September 2016 
and together we will make a canvas full of textures and colors, 
filled with amazing products by ColourArte and Finnabair.
.

20160731_115537

20160731_11564520160731_115612
20160731_115616


In this workshop we will create textured background with Finnabair Art Basics, stamps and stencils, 
we'll do watercoloring techniques and draw beautiful flowers with ColourArte products
and make amazing butterflies with the new Vivid acrylic paints by ColourArte.
And of course you will return home with a beautiful canvas made by you :)

I can't wait to meet in person all of you who will be attending my class, 
I'm sure we will have an amazing time!


Here is my introduction on the Zumo Creativo web site


ATHANASIA: ME AND MYSELF

MY NAME IS ATHANASIA WHICH MEANS IN GREEK IMMORTALITY.  AS A MUSICIAN I LOVE ALL KINDS OF ARTS. WHEN I AM NOT PLAYING THE PIANO, I FIND MYSELF AT MY SCRAPPY DESK MAKING ART JOURNAL PAGES, LAYOUTS, CANVASES, TAGS, ATCS, ALTERING THINGS AND MORE.  (TRADUCCIÓN ESPAÑOL –> MY NOMBRE ES ATHANASIA QUE SIGNIFICA INMORTALIDAD EN GRIEGO. COMO MÚSICO QUE SOY AMO TODO TIPO DE ARTE. CUANDO NO ESTOY TOCANDO EL PIANO, ME ENCUENTRO A MÍ MISMA EN MI MESA DE SCRAP HACIENDO PÁGINAS DE ART JOUNAL, LO, CANVASES, ETIQUETAS, ATC´S, ALTERANDO COSAS Y MÁS.)
retrato redondo
I get inspiration from almost everything like colors, nature, flavors and smells and of course my music. I like vintage look as much as modern, that depends on the mood. (Traducción–> Cojo inspiración de casi todo, como de los colores, la naturaleza, sabores y olores y por supuesto, de la música. Me gusta más el look vintage que el moderno, eso depende del humor.)
I love the limitless choices & combinations of mixed media techniques, not only with memories of my life & my family, but also with emotions & ideas that I have in my head & want desperately to express! I enjoy making videos and I hope I will inspire you with my projects! (Amo las elecciones y combinaciones ilimitadas de las técnicas mixed media, no sólo con los recuerdos de mi vida y mi familia, sino también, con las emociones e ideas que tengo en la cabeza y que quiero expresar desesperadamente! Me divierto haciendo videos y… ¡Espero inspirarte con mis proyectos!)

my Social pages

Instagram: Athanasia Papantoniou –  http://instagram.com/athanasiapapantoniou/
Thank you for visiting

Have a lovely crafty day!
xxx
Athanasia